Sunday, January 6, 2013

Adding more wallpapers to TwWallpaperChooser.apk

Now that I have explored how to de-compile an APK, we can play with its resources and XML files. The first experiment I did was to remove unwanted wallpapers from the TwWallpaperChooser.apk and add what I want it as default.

so here it goes, the basic procedure remains same, as decompile the apk and then recompile the apk.

First de-compile the apk into a folder with the below commands
apktool TwWallpaperChooser.apk TwWallpaperChooser

You would see a folder created with the files as shown below.


The contents of the folder is as shown below.


The important folder, and file you need to know in this case are /res/drawable-hdpi/ this folder contains all the images and their thumbnails, thumbnails are with _small in the name, and are of size 170x142, and main wallpaper images are of size 960x800. You can add more pictures and their thumbnails with the same size.

The reference to these files are made in the file /res/values-hdpi/arrays.xml, you need to edit this file to add more files and then recompile to generate a TwWallpaperChooseNew.apk.

Once you have your New APK ready, open both the NEW and OLD APK in some zip manager such as 7zip, and copy the resources.arsc from NEW apk to OLD apk, and also copy the images you have added into corresponding folders, and you are ready. The apk can be renamed to .zip file, so that it can be opened in zip manager, and once your copy is done, rename back to .apk file. 

You can now copy this file into /system/app and chmod to 644 and you are ready to use new TwWallpaperChooser.apk with added wallpapers. 

Here is few screen shots from what I have done. 


Hope you would enjoy doing it. Let me know if you have any questions.


Saturday, January 5, 2013

Decompiling Android APK to view the JAVA code

Recently, I have started hacking into the code of some of the APKs in my android phone after rooting it again, I decompiled the apk with APK tool, and did some work, now trying to get into the java code of the apk, came across a post and I found it very neat useful, and I am reposting it here for my personal reference at later point of time, with due respect to the original owner, I have not modified the content, here is the link to original post. 

1. Obtaining the “apk” file: 

There are many ways that you can obtain the apk file. You can probably find it on the Internet. Or the best way is to get it from your phone. In this example, we will tear apart facebook android app

The apk file of the application that is purchased from the android market is stored in ‘/data/app’ folder on your phone. To access this directory, you need super-user access. If your phone is rooted, follow the steps below to obtain the apk file if not, you might be able to get one from the Internet.


Copy over the apk file on to your computer from the sdcard.

2. Obtaining the “.dex” file: 


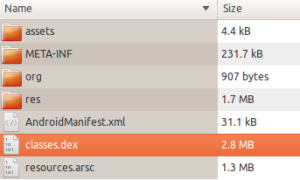
Open the downloaded apk file as a zip file. You can use “Archive Manger” on linux or “WinZip” on windows. You can also change the file extension to “.zip” and have the OS automatically open it as a zip file.

In there, you should see “classes.dex” file. This is the byte code of the complied application. Extract the file on to your computer.


3. Dex2Jar tool: 


You need dex2jar tool to decode the dex file to a jar file. The dex file is the Dalvik executable file. You can get the latest and greatest version at

http://code.google.com/p/dex2jar/downloads/list.

Download and install the application in your computer. I extracted it out on my android installation folder.

Once you have it run the “dex2jar” command to decompile the “.dex” file extracted in step 2.

You can run the following command on linux, on windows you can run the “dex2jar.bat” instead of “dex2jar.sh”

1 $ ./dex2jar.sh classes.dex

You should see an output as follows.


4. Decompiling the jar: 


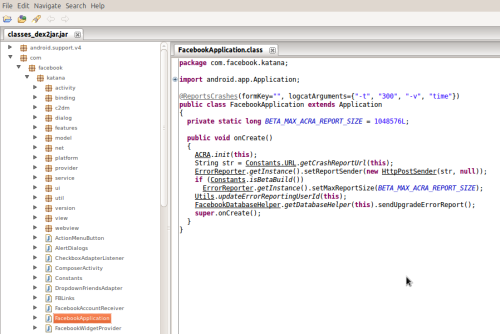
You can now open the decoded “.jar” file from step 3 on a java decompiler of your choice.

There are few out there. I choose JD-GUI. You can download one from their site at:http://java.decompiler.free.fr/?q=jdgui

Install the tool and open the jar extracted on step 3. Boom now you can see the application code!

Friday, January 4, 2013

Decompile/Recompile apk's with ApkTool

You need to have 

  1. apktool / aapt, which can be downloaded from code.google.com (Click this link !)
  2. Java Runtime Environment(JRE), normally you would have it in your PC. It should be atleast 1.6, make sure to add this in your windows path variables. If you don't have it, then Google !
  3. Follow the instructions on the code.google.com to install the apktool and aapt, and unzip them to windows folder. On a windows system it is done like this (copied from the site, you can as well look there for other OS)
    • Download apktool-install-windows-* file
    • Download apktool-* file
    • Unpack both to your Windows directory
  4. Now your apktool is ready to use.
Now first things you need to do for decompile any APK is that, to have the framework file for that APK. apktool comes with the standard framework, so you need to execute the following command to get the framework required for decoding.

apktool if your_application.apk

You would get some message like below.
I: Framework installed to: /home/brutall/apktool/framework/2.apk

For more information about these framework files you can refer to google website here. (FrameworkFiles)

Now create a folder for you work, and place your_application.apk file in that folder, and open the command prompt and cd to that folder, and run the following command, you apk would be decompiled. 

apktool d your_application.apk your_application

This would create a folder named your_application with xml, resources, images etc. You can change whatever you want to  (if you know how to change! else do some experiment)

Now that you have changed you can pack them back to apk using apktool, run the following command. 

apktool b your_application your_applicationNew.apk

Now, as you know that signature would be different in this new APK, you have to open both these New and  original APK in a zip manager such as 7zip/Winzip and replace the images if at all you changed into the respective folder inside zip file, and also resources.arsc files.

This would complete the change, you can place it back where ever your apk was before, and ENJOY !!

Feel free to leave a message if it helped you in any way, and also let me know if you face any issues, would love to guide you. A Thanks would cheer me for writing more such posts :)