Friday, November 22, 2013

Android: How to Launch Another App from Your App

I have been learning Android from quite sometime now, and in fact I am learning, hacking, and experimenting and doing some minimal development. sometimes its good to tell, how you did it may be it would help someone out there.

As you know in android everything has an Intent, so to launch another App from your app, you can create an Intent within your app saying that you want to launch the other App and then using that Intent start the activity as shown below.

Intent i = new Intent();
i.setComponent(new ComponentName ( "com.shetty.test","com.shetty.test.MainActivity"));
i.setFlags(Intent.FLAG_ACTIVITY_NEW_TASK); 
startActivity(i);

Here what you need to notice is that the FLAG_ACTIVITY_NEW_TASK needs to be set, so that this is launched as a new task, else would result in Force Close.

Virtuous Ten Studio IDE for Reverse Engineering the Apks and Mods

I curse myself for being not aware of this wonderful IDE, which was developed some awesome developers. It's more like an Visual C++ IDE for the Android reverse engineering, it is very clean and make life much easier with its integrated environment and the folder structures it uses, after trying this, AndroidMultitool looks very premitive, never the less, Multitool has one advantage, which came to to help to crack one of the Apks recently, that it allows to sign separately, that way you can add some files inside the apk built and then sign it, which when I tried was not possible with this IDE. But this is not the case always.

Here is a screen shot of how it looks,


  • The best part of this is 
  • The smali sytax highlight and the Java code generation with so much ease, 
  • The tools that are integrated into
  • Easy navigation from the project source path to the binary path etc. 
  • Also best thing is after you have built the binary, you can directly push into the device, no need to copy and install on device, just a click.
  • And You can get the apks directly from the phone without having use another shell prompt or adb to pull them from the /data/app folder.
Overall this makes the job very easy, and hence you spend more time on finding the right thing rather than in doing it. 


Thursday, November 14, 2013

Android Application Hacking

As most of you know android is based JAVA, and it runs a Linux kernel. It uses a Dalvik Virtual Machine, and which is bit different from the Java Virtual Machine (JVM). Dalvik code since it is based on Java, we can have all the fun of java. I.e. We can decompile an Apk and generate the source code and them modify whatever we want to and then recompile to generate an custom application. This is all because of the DVM byte codes. If it were to be C language, it would not have been possible. 

I would like to write in detail as to how we can hack an application and different tips and tricks to be used, which I come across while doing such stuff. I am warning you, hacking is only for educational purpose, and I do not support unethical hacking. 

There are some good tools around which would actually simplify our process of decompiling, compiling, and signing of an app. And my preferred application is AndroidMultitool 

Here is the link to download the same, and usage details can be found in the same place, and I do not talk much about it, other than the link. But all I can say is that this is an wonderful tool, which makes the process super quick. 


First of all, you must know that your phone must be rooted to get access to these APKs and once rooted, this can be found at /data/app folder. Do a grep and find out where is the APK to be hacked. 

Some of the hacking tips now. 

Removing ads from the application. 

You must understand that the ads generate revenues for the developer and so we must support them, having said that, we can always get rid of it for many reasons, as it consumes lot of your 3G data. So it is your final decision what you want to do with it. We have different ways to go with it.


  • You can install some ad blocking apps which would actually modify your host file in Linux to block all the ad sites, which would not allow the app to fetch ad and show. 
    • But some ads would show local ad banners when network connections are not available.
    • Some apps would need internet connection for their working, so we can't disable internet connection in first place. 
    • Some would leave a blank space in the screen which is reserved for the ads, which eat up lot of screen real estate. 
  • Having said all this blocking the network connection for this app may not be so convenient, but it would be easy to do this for most of the apps, and most apps don’t leave space when network connection is not available, and hence this should be considered as the first preferred option. :)
  • You can find some very good apps for firewall, which can do this for you. I personally use Droid Wall to do handle the firewall. 
  • You can remove the ad content from the XML layout and recompile the app.
    • You need to search for the string @id/ad in all the xml files in resource folder, then use some common sense to change the height and width to zero. (0.0dip). Sometimes, you can remove this lines completely. 
    • If the app crashes after removing these lines, then it could be that these resources are accessed with in the code, by index and not by name, in that case, we may not be able to remove them, we can hide them by setting and android: visibility="invisible" or "gone". Gone would completely remove it, and invisible would make it transparent, but the screen real estate will not be recovered for other elements. 
Hacking the Android Apps (Getting Pro Features on Free Apps)

It may not be always possible to get the pro features on Free apps, but most of the times, we see that the Free app would have all the features in the application, but it would be blocked. In such cases we can search for some strings in the application project which we have decompiled, and try to figure out functions where they are blocked then unblock them.

Most of the cases I have seen till now, are very simple (I mean most complex blocks are easy to crack)
We  need to replace a line as below.

#if-eqz goto :cond_0
goto : cond_0

This is very trivial change, and it can change the flow of code, and then you would be able to use the Pro features. Or sometimes, some functions would be called to get some license checks which would return a zero on nonzero, and later that would be compared in many places, you make the function always return what is expected, your job is done. 

It is more of common sense to go through the smali files generated, and find out. You can check the smali syntax in Google, and that would give some good insight into what exactly the code is doing. 

Monday, August 26, 2013

Connect to a Wifi Network with WEP Encryption (Wifi Router) on Windows 7

It was some strange issue that I was able to connect to the Wifi network on one of my friends place on my phone, but I was not able to connect to my laptop, Whenever I tried to connect, It was asking for username and password. I am wondering what is this additional username field.

Did some Google and found that the issue was that the Wifi Router is using the WEP encyption, which is bit old and less secure, and hence windows 7 does not allow such connections, and you need to setup the connection manually. You need to follow below procedure to connect to such a Wifi Network.

Right Click on Wifi Symbol in Windows 7 Task bar, and select Open Network and Sharing Center.


Click on Setup a new connection or network


Select Manually connect to a wireless network


Now fill the SSID of the network with which it is identified (Hostel in this case) and also the password, select WEP as security type.


Now when you click the setup should complete successfully and it should work fine. All names and passwords are case sensitive, so be careful with case when entering. Hope this makes you day. Enjoy. 


Monday, June 17, 2013

Persistent Mapping of Windows Folder to a Drive

Have you ever wanted to a persistent mapping of a perticular folder to a drive to keep things segregated? I wanted to do it, because in office we were not supposed to partition the C: drive for some reason which I don't know.

So here is how you do it. You need to a Registry Entry for the new Drive. Open Regedit and make an entry as below.

HKEY_LOCAL_MACHINE\SYSTEM\CurrentControlSet\Control\Session Manager\Dos Devices]


Name - Z: (Drive letter you want to use)
Value - \??\C:\Users\pshetty1\2560P

You can go ahead and hide this folder in C Drive, so that you don't want to see here :). You need to restart the PC to see the changes.

Monday, March 11, 2013

Hacking android apps

Offlate I got some time to write a blog post to explain how to hack an android app. I always thought that hacking is very difficult. But later i realised that it is not that difficult.

There are few tools you need to start with android hacking. You would need to decompile the apk, and modify the smalli code,and then recompile the same. Zipalign and sign,. you are ready to go.

There are few things to keep in mind when hacking, first you need to study the application to find places where we see the checks, for example may be the screen where the password is asked etc. Then you can search the String resources with the Strings on those screens to find the logic related to F password cheek etc,you can then either change the logic or skip the code, os may be make that function return true inspte of the failed cheek. You are done, then recompile and see if it is working. If it does not don't be disappointed. You need to try again untilyou get the right hack.

Remember one thing most of the times the changes needed are not more than one line of code change. You would be surprised to see such week apps, But whatever they make to protect the app it is easy to hack.

Enough for now. This is kind of Introduction to hacking, you may need to google to find out how to decompile, recompile, sign, zip align etc, but at the end of the day it is fun

Sunday, February 17, 2013

Refreshed Galaxy SL (S3+)

Here the some UI update i did to my Galaxy SL to make it look more refreshed. Galaxy S3 icon, all new launcher,  and keypad.

Screen Capture In Galaxy SL

I was always assumed that this phone does not come with the default screen capture option. i accidentally got a screen capture when some call screen got captured by a combination of key press.

Then I searched a while and found that holding back key pressed and then pressing the home key will capture the screen shot.

I always used the root utility shoot me to capture the screen. I think this is a great deal.

Sunday, January 6, 2013

Adding more wallpapers to TwWallpaperChooser.apk

Now that I have explored how to de-compile an APK, we can play with its resources and XML files. The first experiment I did was to remove unwanted wallpapers from the TwWallpaperChooser.apk and add what I want it as default.

so here it goes, the basic procedure remains same, as decompile the apk and then recompile the apk.

First de-compile the apk into a folder with the below commands
apktool TwWallpaperChooser.apk TwWallpaperChooser

You would see a folder created with the files as shown below.


The contents of the folder is as shown below.


The important folder, and file you need to know in this case are /res/drawable-hdpi/ this folder contains all the images and their thumbnails, thumbnails are with _small in the name, and are of size 170x142, and main wallpaper images are of size 960x800. You can add more pictures and their thumbnails with the same size.

The reference to these files are made in the file /res/values-hdpi/arrays.xml, you need to edit this file to add more files and then recompile to generate a TwWallpaperChooseNew.apk.

Once you have your New APK ready, open both the NEW and OLD APK in some zip manager such as 7zip, and copy the resources.arsc from NEW apk to OLD apk, and also copy the images you have added into corresponding folders, and you are ready. The apk can be renamed to .zip file, so that it can be opened in zip manager, and once your copy is done, rename back to .apk file. 

You can now copy this file into /system/app and chmod to 644 and you are ready to use new TwWallpaperChooser.apk with added wallpapers. 

Here is few screen shots from what I have done. 


Hope you would enjoy doing it. Let me know if you have any questions.


Saturday, January 5, 2013

Decompiling Android APK to view the JAVA code

Recently, I have started hacking into the code of some of the APKs in my android phone after rooting it again, I decompiled the apk with APK tool, and did some work, now trying to get into the java code of the apk, came across a post and I found it very neat useful, and I am reposting it here for my personal reference at later point of time, with due respect to the original owner, I have not modified the content, here is the link to original post. 

1. Obtaining the “apk” file: 

There are many ways that you can obtain the apk file. You can probably find it on the Internet. Or the best way is to get it from your phone. In this example, we will tear apart facebook android app

The apk file of the application that is purchased from the android market is stored in ‘/data/app’ folder on your phone. To access this directory, you need super-user access. If your phone is rooted, follow the steps below to obtain the apk file if not, you might be able to get one from the Internet.


Copy over the apk file on to your computer from the sdcard.

2. Obtaining the “.dex” file: 


Open the downloaded apk file as a zip file. You can use “Archive Manger” on linux or “WinZip” on windows. You can also change the file extension to “.zip” and have the OS automatically open it as a zip file.

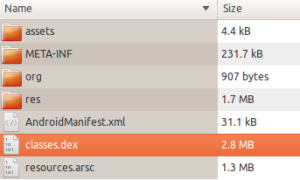
In there, you should see “classes.dex” file. This is the byte code of the complied application. Extract the file on to your computer.


3. Dex2Jar tool: 


You need dex2jar tool to decode the dex file to a jar file. The dex file is the Dalvik executable file. You can get the latest and greatest version at

http://code.google.com/p/dex2jar/downloads/list.

Download and install the application in your computer. I extracted it out on my android installation folder.

Once you have it run the “dex2jar” command to decompile the “.dex” file extracted in step 2.

You can run the following command on linux, on windows you can run the “dex2jar.bat” instead of “dex2jar.sh”

1 $ ./dex2jar.sh classes.dex

You should see an output as follows.


4. Decompiling the jar: 


You can now open the decoded “.jar” file from step 3 on a java decompiler of your choice.

There are few out there. I choose JD-GUI. You can download one from their site at:http://java.decompiler.free.fr/?q=jdgui

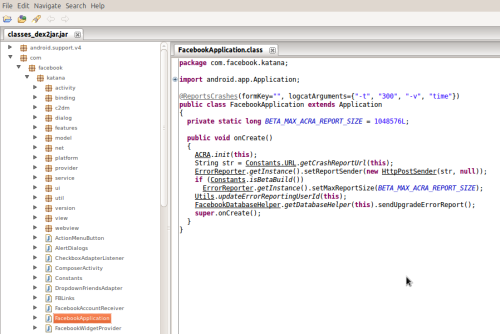
Install the tool and open the jar extracted on step 3. Boom now you can see the application code!

Friday, January 4, 2013

Decompile/Recompile apk's with ApkTool

You need to have 

  1. apktool / aapt, which can be downloaded from code.google.com (Click this link !)
  2. Java Runtime Environment(JRE), normally you would have it in your PC. It should be atleast 1.6, make sure to add this in your windows path variables. If you don't have it, then Google !
  3. Follow the instructions on the code.google.com to install the apktool and aapt, and unzip them to windows folder. On a windows system it is done like this (copied from the site, you can as well look there for other OS)
    • Download apktool-install-windows-* file
    • Download apktool-* file
    • Unpack both to your Windows directory
  4. Now your apktool is ready to use.
Now first things you need to do for decompile any APK is that, to have the framework file for that APK. apktool comes with the standard framework, so you need to execute the following command to get the framework required for decoding.

apktool if your_application.apk

You would get some message like below.
I: Framework installed to: /home/brutall/apktool/framework/2.apk

For more information about these framework files you can refer to google website here. (FrameworkFiles)

Now create a folder for you work, and place your_application.apk file in that folder, and open the command prompt and cd to that folder, and run the following command, you apk would be decompiled. 

apktool d your_application.apk your_application

This would create a folder named your_application with xml, resources, images etc. You can change whatever you want to  (if you know how to change! else do some experiment)

Now that you have changed you can pack them back to apk using apktool, run the following command. 

apktool b your_application your_applicationNew.apk

Now, as you know that signature would be different in this new APK, you have to open both these New and  original APK in a zip manager such as 7zip/Winzip and replace the images if at all you changed into the respective folder inside zip file, and also resources.arsc files.

This would complete the change, you can place it back where ever your apk was before, and ENJOY !!

Feel free to leave a message if it helped you in any way, and also let me know if you face any issues, would love to guide you. A Thanks would cheer me for writing more such posts :)