Sunday, September 18, 2011

Replace ADB Shell With Putty

If your phone is rooted, you need ADB (Android Debug Bridge) for accessing the phone over command line. And when on Windows you may not be comfortable running the Linux command prompt on Windows. You can always run a telnet server on your android phone, and connect using the Putty, but this needs lot of work, and its not an easy option. 

There is an easy option with the help of ADB, you need to have a modified Putty for this, which has the ADB connection type to choose from, and then you can use Putty as you normally use to. Thanks for senior XDA member sztupy. sztupy has compiled a Putty binary with most of the settings pre-set. Here is a snap shot of the same for your reference.

image

All you need to do is to set the host name to 'transport-usb' as shown and if port number did not come automatically set it to '5037' and you are done. 

Connect the phone using usb cable ans set the debugging mode on, as you normally do to use with ADB, you can enjoy the familiar Putty interface.

Install Samsung TouchWiz 4.0 for Galaxy SL i9003

If you have updated to the Gingerbread 2.3.4 and rooted by following posts on my phone, then you would see that there is not much cosmetic changes done to the User Interface, except for the status bar battery icons etc. The easiest way is to update to a new UI is to install any other launcher such as Go Launcher. In fact Go Launcher Ex is very powerful, and it has most of the features you would look for in your phone, and also many themes are available for download. As a second launcher I would always have it on my phone, in case the primary one fails after some updates etc. 

But the battery consumption seems to be very high, may be because of the visual effects. The main reason I wanted to update to new UI theme is that, with Galaxy S2, Samsung had get rid of that icon tiles which would give an iPhone type look. But sometimes the choice of wrong color for the tile makes it look very boring, and some how I am bored with it, and want to get rid of it.

So, I come across this link on XDA, and he has given the TouchWiz 4.0 Launcher apk, which is working fine with my Galaxy SL, and I have obsolutely no issues with it. Few of the Widgets does not work with it, especially the Samsung ones and mostly you don't need them at all, so you can delete them get rid of it.

The install process is very simple,

  • Copy it to SD card via ADB or any other method.
  • Use ADB connection, and login as root.
  • Mount the /system/ as RW
  • There will be TouchWiz30Launcher.apk and TouchWiz30Launcher.odex files, make a back up of them incase if something goes wrong.
  • Replace the TouchWiz30Launcher.apk with the new one downloaded.
  • You need to place the lib file inside the /system/lib folder
  • Use cat source > destination as cp command does not work

Now that most of things work except for Samsung Widgets, There is an Share button when you edit the app drawer, which would cause a force close, you need to fix this.

Download the ShareApp.apk from here, and place it in the /system/app/ folder following the same method mentioned above.

You are DONE, you would have a fully running, low battery consuming Samsung Touch Wiz 4.0 ready on your phone, Enjoy.

The Benefits are as below. 

For appdrawer:
  • column count
  • item count per page
  • free sort mode / alphabetical sort
  • enable/disable colored tile
For Home screen:
  • enable Landscape mode (if you change from off to on -> needs a reboot to take effect)
  • use big page indicator icons
  • whether to show the App names
  • uninstall apps from home screen [on/off]
  • page indicator icon fades off after swiping [on/off]
  • amount of rows on home screen
  • screen count-defaultscreen (starts at 0)
  • amount of icons in dock (not tested with higher numbers then 5)

Friday, September 16, 2011

Google Music Beta on Android

You might have heard that Google had launched the music beta service, which is similar to the other Google service which is linked to your Google account, but only limitation as of now is that it is available on in the United States, and it also says that its free for limited period of time. May be only till the beta testing is complete, but I hope to have it continued after that. You can store about 20,000 songs to your account and they will be stored in cloud, so that it can be accessed from any device, such as TAB or Android Phone. You can carry your music collection where ever you go, sound impressive huh? why don't you get one? 

All you need is an US proxy and log into your Google account from the proxy server or VPN and request for one, or if you have a friend who can send invite ask him to send one. So you would get the invite in few days if you have requested for one. 

After the invite is received you can download the music manager from music.google.com and install it. 
  • Make sure you keep all your tag information for the songs updated before uploading using Google Music Manager, otherwise it becomes a mess later to organize your music. Google music would organize your music based on the tag information.
  • Also make sure that you use the folder upload option rather than windows media player library sync, because mostly if you have updated the tag information recently, it seems to be not working fine. 
  • Anyways, follow which ever method, but upload the music, but one thing to remember, while uploading you don't need to be in VPN, and sometimes with VPN, if corporate it will not work.
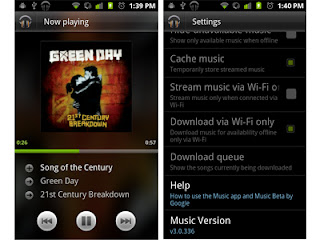
Now you need android application to use the same music on your android device, but if you are not in US, then the market wont allow you to install from there, even though it is free application. So you need to download it from here, and install using any other method, such as copy to SD card then install by enabling non market application installation in settings.


Once you have installed fortunately, it does not need a VPN to play your music, you can be in any country, Wifi/3G/EDGE/GPRS, it can play the music for you.


Thursday, September 15, 2011

Root Samsung Galaxy SL (i9003) Gingerbread 2.3.4 (XXKPH)

I had hard time finding how to root the Samsung Galaxy SL, 2.3.4, XXPKH. There were many blogs and website talking about rooting, but because XXKPH was the latest version and it was 2.3.4, most of the methods mentioned in there does not work. 

The most basic method is to use the SOC (Super One Click) and it does not work with XXKPH, because the kernel exploit cannot be done by Ginger break, and it seems they have closed the loophole which ginger break was using. The original Ginger break method was mentioned in this website, and he has clearly mentioned that it has to be using the usb debugging mode on adb. SOC also uses the same method, and it should be the only way to do it.

Now how do we proceed, I read in a Spanish website for i9000 that the kernel must be replaced with a kernel which can be exploited and then exploit using SOC and replace back the original kernel after installing SU (super user app). I found it something convincing and then tried the method on XDA developer where he talks about flashing the fixed binary and then normal boot again. I was scared to try this before as I do not want to use any modified binary as the XXKPH is very stable, and battery life and GPS are working awesome for me. Any change would only deteriorate the performance, as these people may have done somethign which they are not very sure of.

Here goes the method for XXKPH
  • After Flashing to new Firmware , Go to Downloading Mode By pressing volume down + menu button + power button and Flash the Phone Using the PDA file GT-I9003_PDA_XXKPE-fixed.tar
  • Root USing SOC (Latest version of SOC can be downloaded from here)
    • While rooting, you may find that it it stuck at step #6, may be you can disconnect the cable and connect back, and it should do the trick !! (happened with me)

  • Flash PDA with the normalboot.img.tar attached below
Note: With the absolutely beautiful ADB exploit I use, titled rageagainstthecage (ratc), absolute ALL devices can be rooted. This is because it exploit is ADB which all devices use. There is an issue though. Some devices have a NAND lock which does not allow you to write to the /system mount. Because of this, you can't copy su, sqlite or busybox to /system/bin. This creates some issues but there is a work around. For things that don't need access to /system (like enabling non-market apps) I can use the ratc exploit to make those changes. If your device cannot use su in /system/bin then you can simple select a checkbox (as of v1.5) that says to use ratc. 


There are 3 levels of "root" we can define:
Level 1: Shell Root (with ratc rooting the adb shell but no /system write access)
Level 2: Temporary Root (/system/bin/su installed but lost on reboot)
Level 3: Full Root (/system/bin/su installed and sticks)

Some devices have a NAND lock. SuperOneClick will only give a Shell root until you remove this lock.

Gingerbreak uses rageagainstthecage,  is a root exploit via a fork bomb. Some antivirus program may raise alert for malicious content while unzipping, and here is the explanation for it. 

It IS a potentially malicious payload, BUT it is being used with owner's consent to root the phone. The DreamDroid malware use exactly same payload - they are trojans, but this is a helpful tool. It IS a dangerous tool in the wrong hands, but this is a root exploit, so you should exercise common sense and a little understanding of what it does and how it works.

Tuesday, September 13, 2011

Update Galaxy SL (i9003) to Gingerbread 2.3.4

I followed the procedure from here. Out of all the guides out there, which are most confusing this is the best one I have ever come across. He is clear and straight forward of what you have to do, and small guide, not to get confused with lengthy ones.

I am copy pasting it here for your reference, may be for my reference later, as I am not interested with all of it.


Note: XXKPH can only be flashed with help from it's supporting predecessor XXKPE, So make sure you have XXKPE downloaded. User flashing version varies with this, but this is my successful 100% assured boot.
  1. Firstly, Download the link from spacebar's XXKPH Feedback thread.
  2. Run Odin3 v1.83
  3. Set your phone to download mode : Press Volume down + OK first, then hold Power button.
  4. Connect your phone, you should see Odin shows your phone is Added with COM number.
  5. Click PIT button and select this file: latona_20110114.pit
  6. You should see Re-Partition, Auto Reboot and F. Reset Time checked.
  7. Click PDA button and select this file: CODE_I9003XXKPE_CL409735_REV08_user_low_ship.tar
  8. Click PHONE button and select this file: MODEM_I9003XXKPE_REV_00_CL1041909.tar
  9. Click BOOTLOADER button and select this file: APBOOT_I9003XXKPE_CL409735_REV08_user_low_ship.tar
  10. Click CSC button and select this file: GT-I9003-CSC-MULTI-OXAKPE.tar
  11. Click Start button to flash these files to phone.
  12. Do not touch anything till you see PASS on the program window.
  13. Turn off the phone and set it back into download mode once you get an initial first boot to homescreen. Do not set up anything, Just power off and set to download mode. 
    Note: You only need to flash once to XXKPE before proceeding to XXKPH
  14. In Odin, press Reset button. Re-partition should be unchecked automatically.
  15. Select file I9003XXKPH_I9003XXKPH_I9003SERKPH_HOME.tar as PDA
  16. Click on Start to flash XXKPH PDA to phone
  17. Once you have flashed, after the phone started up, press *#1234# and check your PDA,Phone and CSC, everything should ended with KPH
  18. Factory reset and enjoy
Feedback: These is my experience and it may differ.

I had updated for KB2 Indian version. I flashed first XXKPE as suggested by the guide, and then XXKPH. 
  1. Now the battery life seem to have increased, I am not very sure about it, but feels like, my phone use to always crib low battery, and not it does not happen. I hardly put on charging these days :)
  2. No overheating etc, as some might have wrongly mentioned, but as far as I know this is official release for Russia so such issues can't be there
  3. All peripherals and system functions such as wifi, camera everything works fine.
  4. The GPS works like charm, and it has been fixed, it locks within 5 seconds and you are connected. 
  5. There are three new apps
    • Samsung Navigation Route 66 - which seems promising, it has information about the city, so easy to search and navigate.
    • Publication Reader - You can put your paper/magazine subscriptions and can be read offline.
    • There is a short cut to downloads which was much needed and was missing in previous version
  6. Not many cosmetic changes compared to 2.2 Froyo, it's all the same look and feel. The boot animation music has changed, I felt previous one was better.
  7. Performance has not changed much, it's almost same, may be little better I could say. 
  8. Last, but not the least Gmail video chat is something which is expected in 2.3.4 and it does not present in this, and for this you need to root and install the apk from outside, but as of now no good rooting available for 2.3.4, and whatever present seem to be not working.
  9. So if you have problem with battery life, then only update, else no need, and don't wait for gmail video chat support to come, I don't think it would ever come on SL
Note: All the binaries needed can be downloaded from here